MAKING AN AQUARIUM OF GLUED GLASS
Making an aquarium with glued glass is not the exclusive domain of professionals;
these days it is also an option for hobbyists. The crucial factor is the care taken
in the operation, along with a good organization of the work plan and respect for
the sequence of the operation. It is advisable to practice first with a small rearing
tank or hospital tank before taking the plunge and building a large aquarium. Hanging
out in aquarium clubs can be useful, as it will give you a chance to meet experienced
aquarists who can provide advice or give you a hand when you come to glue your first
aquarium.
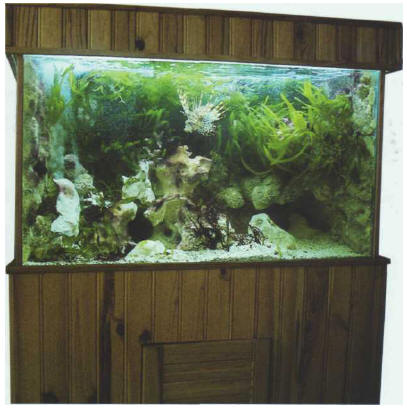
Marine tank built into a wooden closet, made by an aquarist.
Materials and tools
Glass
The fundamental material for your aquarium, the element which underpins its existence,
is obviously glass. It can be cut to measure in glass merchants or do-it-yourself
stores. This operation must be performed correctly, as any slight mistake in the
cutting can have serious consequences, especially if the corners are not perfectly
square.
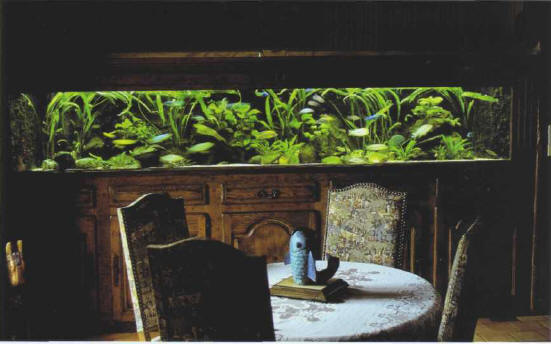
Tank 3.7 m long, reconstituting the biotope of Lake Malawi.
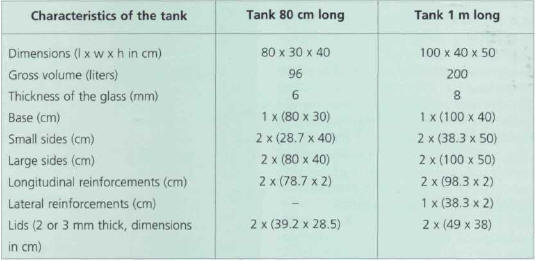
The calculation of the dimensions of the panes must therefore be made with care,
and do not forget to take into account the thickness of both the glass and the layer
of glue (around 0.5 cm). The table below gives you the dimensions of the glass required
for two tanks of different volumes. You need a base, two small sides, the front,
and the back. There are also provisions for longitudinal reinforcements, which prevent
the glass panes from curving due to the weight of water and support the two-section
lid. In larger tanks, where the length is equal to or greater than 1 meter, one
or sometimesseveral lateral reinforcements are also required to consolidate the
unit.
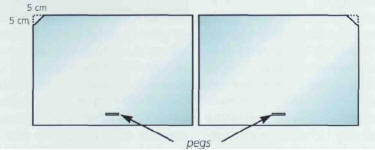
Offcuts of glass can be used as pegs for lifting off the lids. After the cutting,
remember to ask for the edges to be sanded down lightly, to avoid any unfortunate
accidents from splinters or sharp edges.
CUTTING THE GLASS FOR TWO DIFFERENT TANKS
We have chosen one tank of 96 liters and another of 200 liters (the gross volume
in both cases) that can easily be built by two people.
Do not forget to cut a piece off a corner of each section of the lid and have
some pegs (around 2 x 5 cm) ready to use as handles.
Glue
A good glue is needed for sticking the glass walls together effectively: transparent
silicone glue for this purpose is available. When exposed to the air it hardens
to form a watertight join. The speed of hardening depends on temperature, so special
care must be taken in summer. At a temperature of 19-20°C, the glue stays soft for
around 3 minutes, which allows time for working. The hardening is sensitive to the
touch for 1 or 2 hours afterwards, and is complete in 48 hours.

Squeezing the silicone glue onto a sheet of glass.
You are advised to be very careful when handling the glue. If you happen to spill
or smear some, a dried run-off on a smooth surface can be easily scraped off with
a cutter. It is a lot more difficult if clothing becomes impregnated with it. Above
all, make sure not to rub your eyes when handling it and, in the event of any accident,
consult a doctor immediately.
This glue gives off a characteristic vinegary smell which disappears after a
little while. It keeps well if the tube is closed with its original cap and stored
in a cool, dark, dry place.
Supplementary materials
You will require the following materials for the gluing process:
- methylated spirits or acetone, for cleaning the panes before gluing;
- clean rags or absorbent paper;
- cutter with a fine blade;
- sticky tape;
- small receptacle for water;
- set square and tape measure.
When you have assembled all the necessary materials, you are ready to go on to
the construction.
Prepare a work surface large enough to allow you to spread out the panes and
move around freely. It is advisable to get somebody to help you by holding the panes.
Sticking the various elements together
(see panel overleaf).
Installing the box filter
To work efficiently, you must be able to spread the panes
out on a sufficiently large work surface.
There is very little left for you to do, for the moment, apart from installing
a box filter. The filtration system can be planned at the gluing stage or added
afterwards. It can be placed on the right or on the left and must be hidden by exterior
trim, such as a wooden facing that matches the aquarium and its support. Its volume
must not be less than 1/10 of the total volume of the aquarium, if it is to be completely
effective. Inside the tank, you must add the following parts, cut from 3 mm thick
glass:
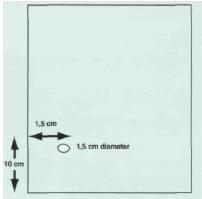
- a glass panel separating the filter from the rest of the aquarium, with
a perforation to allow the water to flow through. Going back to the example
of the two tanks which served to illustrate the gluing of an aquarium, the dimensions
of this panel would be:
- 28.7 x 38 cm for the 96 liter tank
- 38.3 x 48 cm for the 200 liter tank.
- four strips of glass intended to hold the filtering material (3 cm wide
and 38 cm long for the 96 liter tank; 48 cm long for the 200 liter tank).
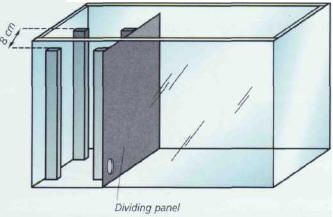
Panel dividing off the box filter.
These elements must be mounted in accordance with the diagram below (if the filter
is to be on the left of the aquarium), with the glass strips in pairs facing each
other. They must not be more than 8 cm apart. The distance between the perforated
panel and the closest side is 8 cm for the 96 liter tank and 10 cm for the 200 liter
one. Note that the box filter is slightly lower than the main tank, to allow the
water to circulate.
Front view of aquarium.
|